


Self-Manage Jira Groups
Overview
P1 has delegated the management of Jira Groups to project administrators. This article explains how Jira project administrators can self-manage groups for their projects.
Prerequisites
Before you begin:
- You must be a Jira Project Administrator for the project whose groups you want to manage.
- The groups you want to manage must be associated with your project. Group names must begin with your project key.
- Your Jira instance must include the Platform One – Delegated Group Management project, which delegates group management to project administrators.
Limitations
- Project administrators can only modify group memberships.
- Groups can only be added or deleted by a global administrator.
Workflow
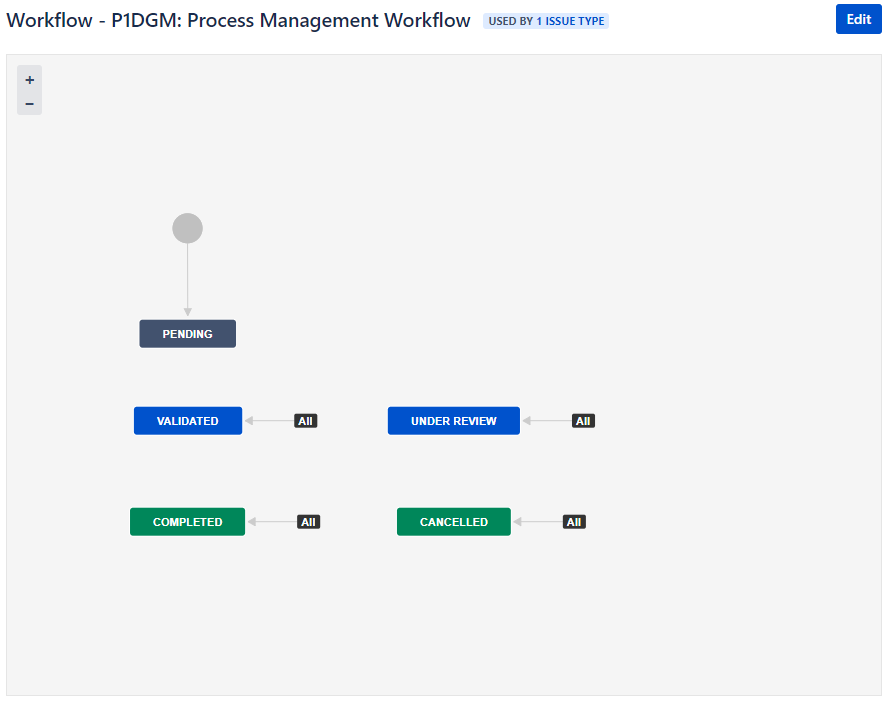
Using a Jira project to process delegated group management provides a change history for your group modifications and allows validation before you make the requested changes.
| Step | Status | Process |
|---|---|---|
| 1 |  | When creating the P1DGM Jira issue, it will ask for all the information needed to process your change. Depending on the action you select, after selecting the Create button, it will perform an initial validation of all the information you provide. Select the Platform One - Delegated Group Management project if it is not already selected. 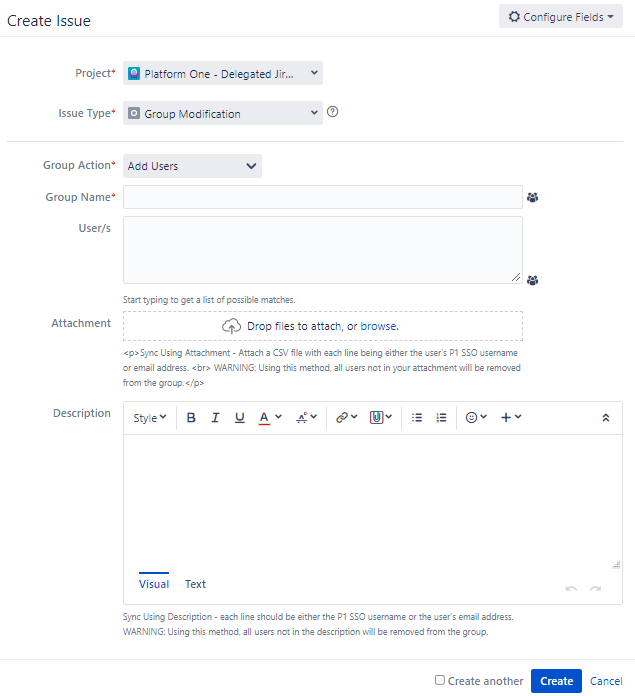 |
| 2 |  | After your request has been created, it will be in the pending status. You can review the validation results in the comments section. 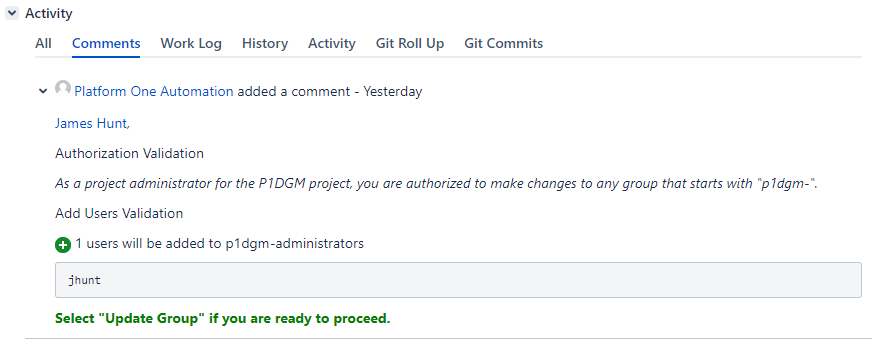 If there are any issues with your request, information on how to resolve them will be provided in the comments. If there are any issues with your request, information on how to resolve them will be provided in the comments. From this status, you can either revalidate your request using Validate Changes, proceed and commit your changes using Update Group, or cancel the request through the workflow transition buttons. 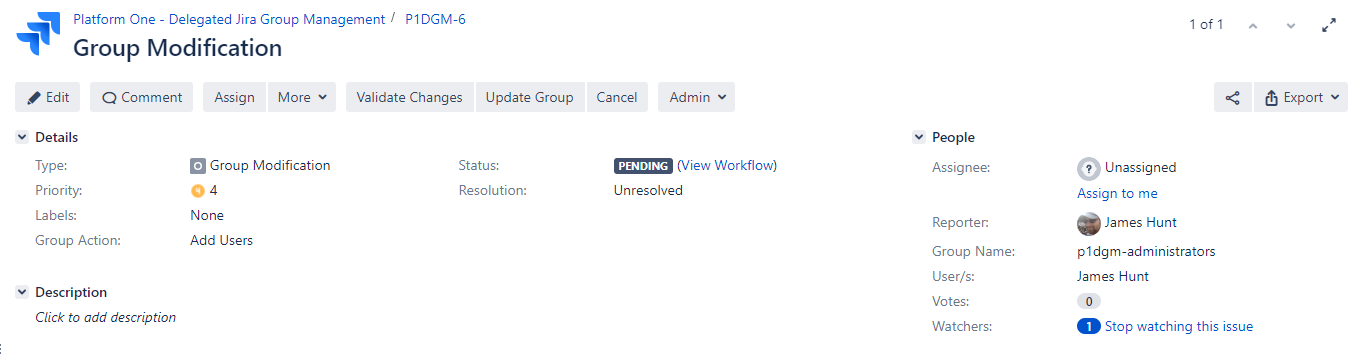 |
| 3 |  | Selecting the Update Group workflow transition button will implement the requested changes to the group. The results will show users who can be added, removed, and/or were already in the group. Additionally, if you provided user information for users who do not have accounts, that information will be listed. 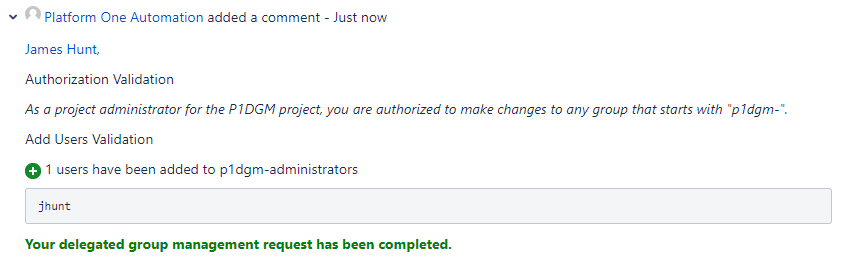 |
| 4 |  | If you determine that you do not want to make the requested changes, you can cancel the request. |
| 5 |  | If there is a security concern with your request, the request will be automatically changed to the Under Review status, and the Support Team will be alerted. |
Managing Groups (How-Tos)
Creating a Group
Only a global administrator can create groups. To create a group, submit a help desk ticket. Be sure the group starts with your project key, and keep in mind that groups are all lowercase, with no spaces and only the '-' as a special character.
Submit a new Jira/Confluence User Group request with the P1 Help Desk.
Note: An administrator of the requested project must submit this request on the user's behalf.
Once the group is added to the respective instance, you will be able to use the delegated group management.
List Users
Before making changes to a group, you can generate a member list using the List Users group action. Follow the steps below to generate a member list.
Note: You must be a project admin to retrieve the list of users in the group.
Set the Group Action to List Users and set the Group Name to the group you need to check.
Review the results in the comments section.
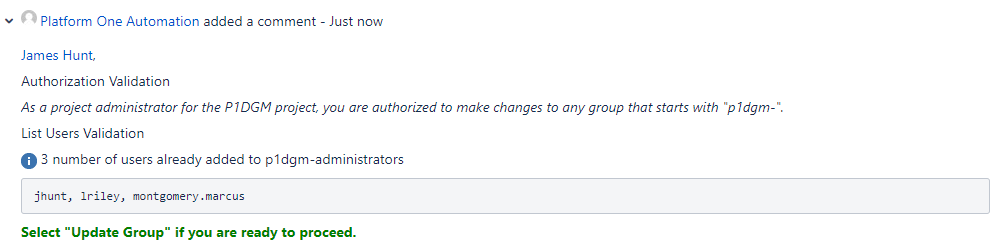
If you want to proceed with another action, edit the Group Action field and proceed to its corresponding documentation in this guide.
Add Users
The Add Users group action adds the users listed in the User/s field to the group in the Group Name field.
Follow the steps below to add users to a group.
Set the Group Action field to
Add Users.Set the Group Name field to the group you want to modify.
Add the users that you want added to the User/s field.
Note: If you do not see the fields in the Issue view, you will need to select the Edit button to view them. If you cannot find the user in the User/s live search, then the user likely does not have an account in the instance. Reach out to them to ensure that they can access the instance.
Review the validation results in the comments section. If you had to edit the request, select the Validate Changes to get the results in the comments section.
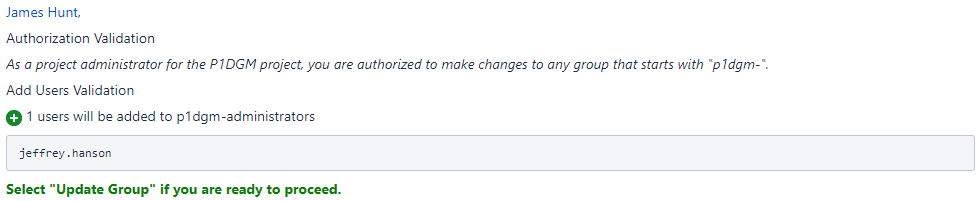
If you want to proceed, select the
Update Groupworkflow transition button and review the results.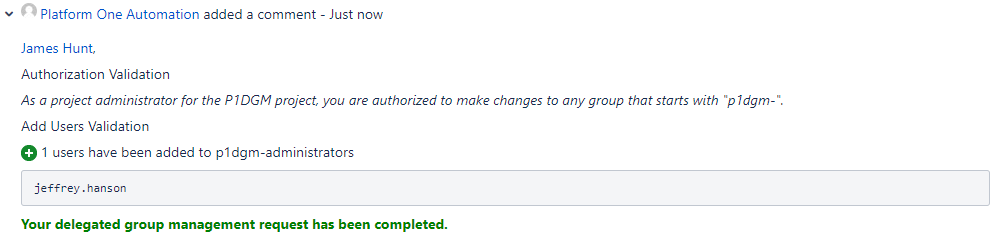
Once your request has been completed, you will need to generate a new one for further changes.
Remove Users
The Remove Users group action removes the users listed in the User/s field from the group in the Group Name field. Follow the steps below to remove users from a group.
Set the Group Action field to
Remove Users.Set the Group Name field to the group you want to modify.
Add the users that you want removed to the User/s field.
Note: If you do not see the fields in the Issue view, you will need to select the Edit button to view them.
If you cannot find the user in the User/s live search, then the user likely does not have an account in the instance. Reach out to them to ensure that they can access the instance.
If you need to know who is in the group, follow theList Usersinstructions, then return to this section.Review the validation results in the comments section.
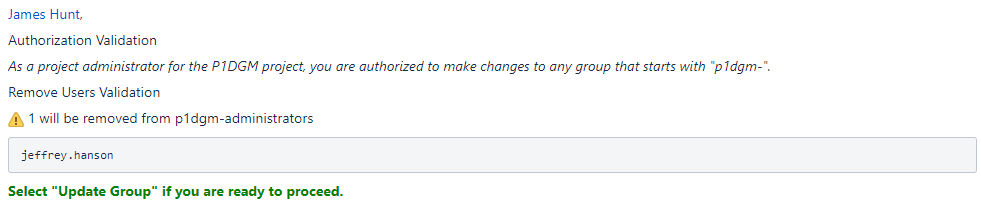
INFO
If you had to edit the request, select
Validate Changesto get the results in the comments section.If you want to proceed, select the Update Group workflow transition button and review the results.
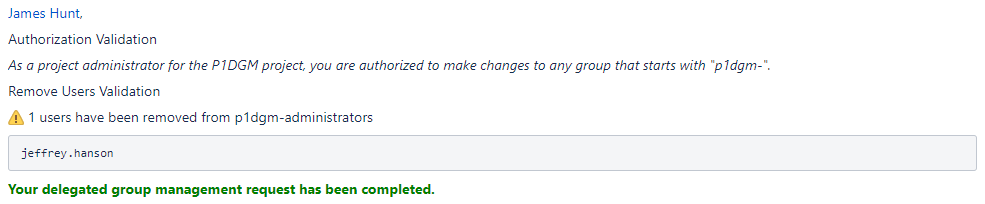
Once your request has been completed, you will need to generate a new one for further changes.
Synchronizing Using the Description Field
If you need to add or remove users, you can use the Sync Using Description group action. What this does is use the list of usernames and/or email addresses in the description field to add users who are not in the group and remove users who are in the group but listed in the description field.
This action will purge users from the group that are not listed in the description field.
There is a maximum character length for the description field. If you get an error that your list is too big for the description field, save your list to a text file and proceed to the Synchronizing Using a Text File section.
Follow the steps below to synchronize using the description field.
Set the Group Action field to
Sync Using Description.Set the Group Name field to the group you want to modify.
Add all of the users that you want to be in the group to the Description field.
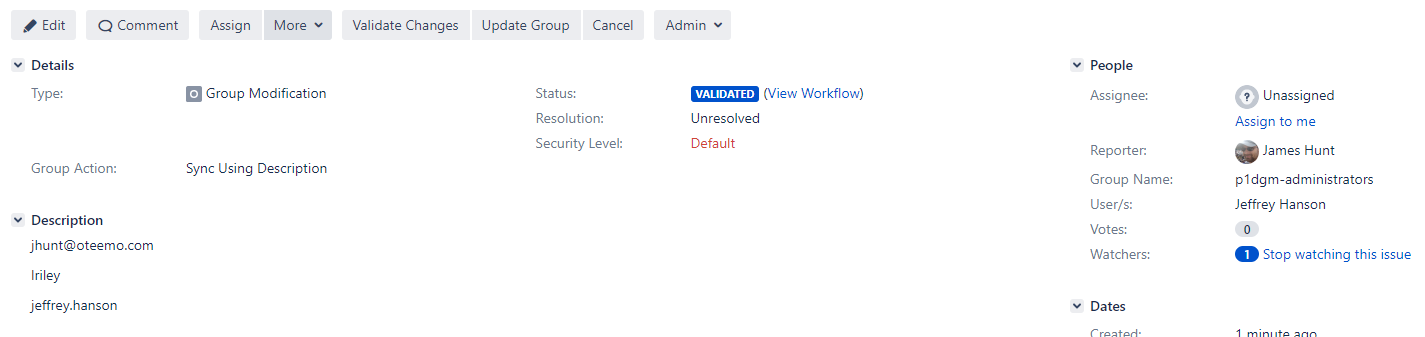
Note: If you do not see the fields in the Issue view, you will need to select the Edit button to view them. You can list users in the Description field either by username or email address.
The user list in the Description can either have a user per line, or be delimited with a comma or semi-colon. We recommend one per line for easier reading.Review the validation results in the comments section.
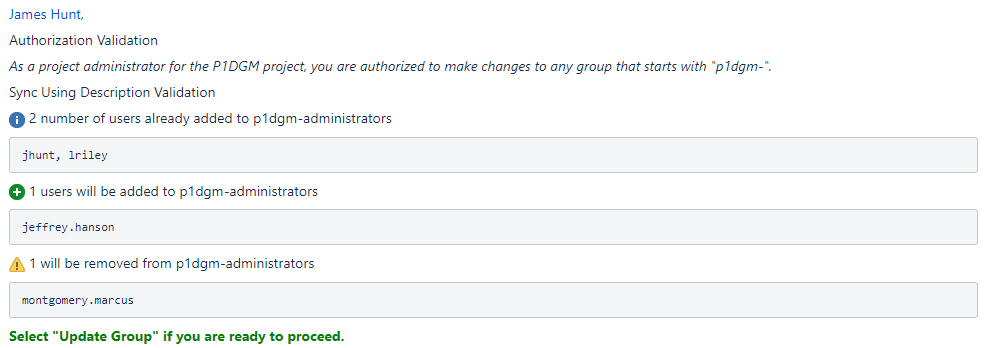
Note: If you had to edit the request, select the Validate Changes to get the results in the comments section.
Depending on the results, you can add/remove users from the Description field and re-run the validation before committing the changes.If you want to proceed, select the
Update Groupworkflow transition button and review the results.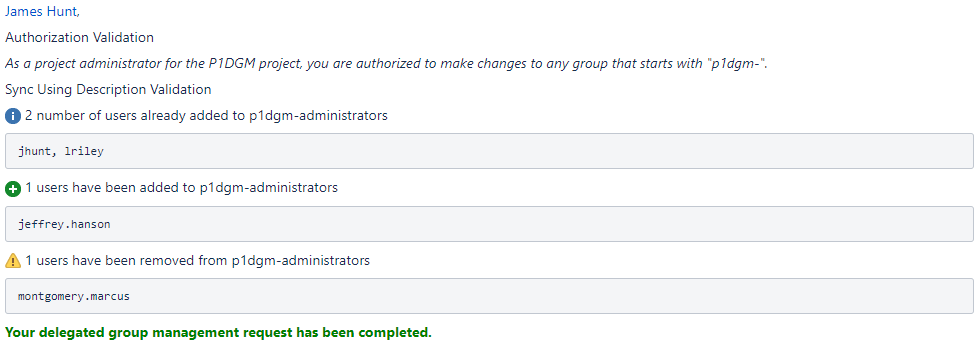
Once your request has been completed, you will need to generate a new one for further changes.
Synchronizing Using a Text File
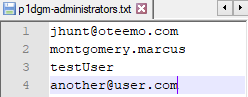
Similar to the Sync Using Description group action, the Sync Using Attachment allows for a much larger list of users. What this does is use the list of usernames and/or email addresses in the attached text file, add users who are not in the group, and remove users who are in the group but not in the attachment.
This action will purge users from the group that are not listed in the description field.
You can have only one attachment per request. If you need to replace the attachment, you must remove the older one.
Follow the steps below to synchronize using a text file.
Set the Group Action field to
Sync Using Attachment.Set the Group Name field to the group you want to modify. Attach your text file to the request.
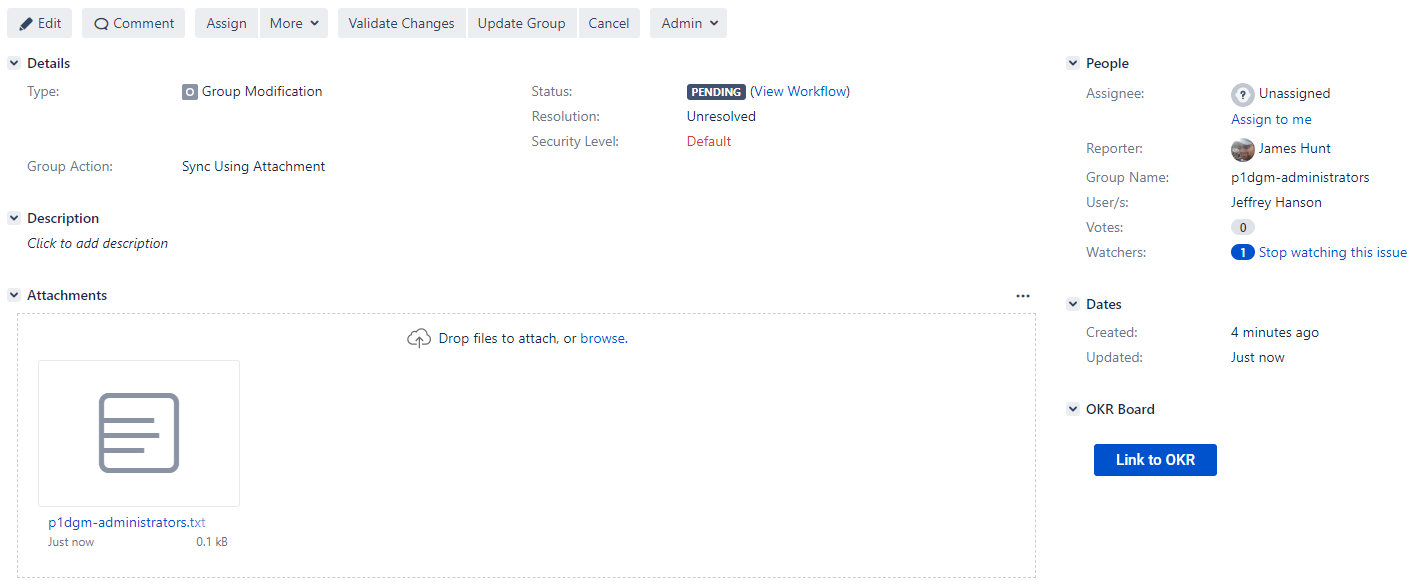
Note: If you do not see the fields in the Issue view, you will need to select the Edit button to view them.
You can list users in the text file either by username or email address.
The user list in the text file can either have a user per line, or be delimited with a comma or semi-colon. We recommend one per line for easier reading.Review the validation results in the comments section.
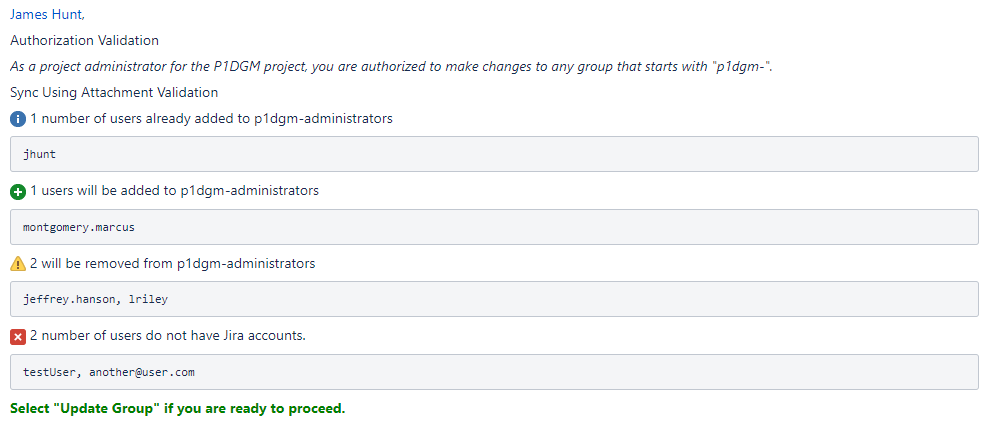
Note: If you had to edit the request, select the Validate Changes to get the results in the comments section.
Depending on the results, you can add/remove users from your text file. You will need to delete the old attachment and add the updated one. After doing so, you can re-run the validation before committing the changes.If you want to proceed, select the
Update Groupworkflow transition button and review the results.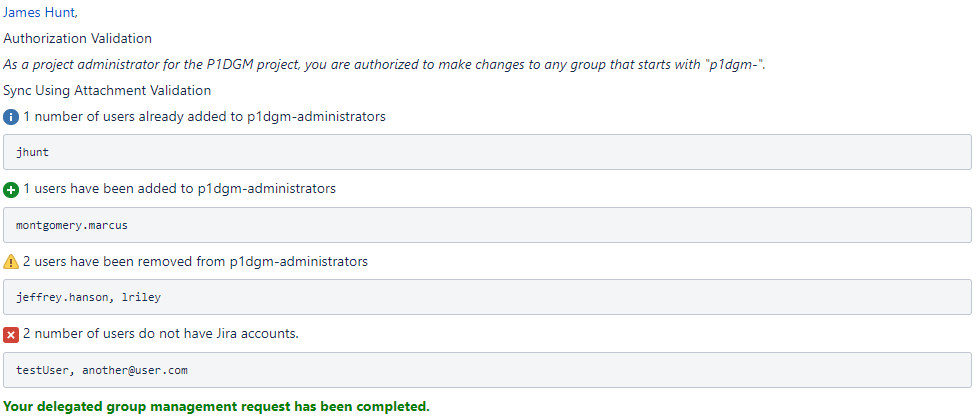
Once your request has been completed, you will need to generate a new one for further changes.